The Basics
 Whether you are building a garage, sending a man (or woman) to Mars, or designing the latest computer, project management using project planning tools is an essential part of the process. Even if you don’t write down the steps to build your garage, you have it in your mind that you can’t build the walls until the concrete floor goes down. And it’s very unlikely you will want to install the door before the walls go up. So for any set of tasks there is an optimum sequence – an order that makes the best sense. Some tasks have to be done serially (walls first, then windows) but some can be done in parallel (windows and doors can be fitted at the same time).
The most common way to graphically describe a project is using the Gantt chart. Each task is represented by a small rectangle, with a line or arrow joining tasks together as they span the plan, left to right. The horizontal axis of the plan is marked out in time (usually days or weeks) so the full plan indicates the expected length of the project. Each task rectangle will be assigned a ‘Time to Complete’, which will determine the length of the rectangle on the plan. Building the walls from bricks will take longer than pouring the concrete floor, so the ‘Build Walls’ task rectangle will be represented as a longer line.
Most project management software gives you the option of assigning cost and resources to each task. So, for example, ‘Fitting the Door’ task will include a cost for the door plus the cost for Fred the local carpenter to fit them, with the resource here being Fred himself. Resources generally refer to manpower, but can include anything you need to get the task done (like a mechanical digger to clear the ground).
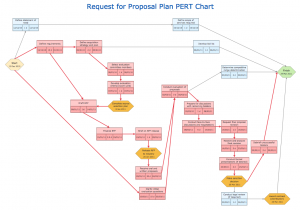 There are many ways to represent all this data. A Network chart is another way to graphically depict the project. This is like a glorified flow chart with interconnecting lines showing the relationship between the tasks. This method can be useful as it enables you to show more data (text) in each task box/rectangle, but for larger projects this can get unwieldy, covering multiple pages.
Planning
The accuracy of the plan (in terms of both time and money) will have a lot to do with how much time and research you put in upfront. You might make a guess that Bill will take four weeks to put up your garage walls. However, if you spoke to him you would find out it will actually take six weeks. The reality in this case is that building your garage is going to take longer and cost more. In most cases it takes longer than planned to complete a task, in which case the costs for that task will also increase. It’s always a good idea – even with as much good planning and estimates as you can get – to add an extra one third to both the task time and costs. And then to add in some extra time and costs for contingency on top of that. Reality has a habit of putting asunder the best laid plans of mice and men.
Tracing a path through the serially connected tasks will give you the project completion date. This route is called the Critical Path – aptly named because any task along the Critical Path that takes longer to complete will push the completion date out. Conversely, any task you finish more quickly will shorten the project time. This is straightforward enough when you just have serial tasks, scheduled one after the other. However, where there are parallel tasks in your plan taking differing amounts of time to complete, things can get complicated. For example, if fitting the windows takes one day, and fitting the door takes only half a day, and both tasks are scheduled to be done on the same day, then the longer ‘Windows’ task is on the Critical Path. But if you encounter a delay of two days in getting the right door hinges, the ‘Doors’ task will then have more impact on the following tasks, and hence be on the Critical Path. Any changes or reorganising you can do to reduce the time spent working on tasks along the Critical Path will effectively shorten the length of the project.
When you are happy with your plan you can save this as your baseline. This is the plan as you believe it will unfold as you go ahead with the project. Once tasks are completed, the tasks on the plan are updated with actual costs and time taken. If you compare the baseline plan to the actual plan you can see how the project is progressing. In the workplace this process is often used to evaluate how well a team is doing – how well they are performing in keeping to the baseline plan. In actual fact, for all but the simplest of projects the actual plan will change so much from the baseline as the project progresses, that they could well look like two totally unrelated plans. In reality, the main use of the baseline plan occurs after the project is complete. You take it to the pub with your team when the project is finished, and laugh heartily over it as you shake your heads and consider how hopelessly optimistic it was.
Software
There’s a lot of software to choose from, and even the good old Excel spreadsheet can be pressed into service for very simple projects. Packages range from free shareware to all-singing, all-dancing varieties costing many thousands of pounds. A good example of a mid-priced package that is well thought of throughout industry is Microsoft’s Project. This has been around for many years now and offers a very good balance between features and usability. That is to say, it’s not so complicated to use that you give up on it and go back to pencil and paper.
On A Final Note
It’s very easy to get sucked into the detail and complexities of advanced project management (so if you come up with a project plan to spend the next six months trying to understand your project planning software, then you have definitely got it wrong). But there are infinite opportunities at work and at home where effective project management with a good plan can help take the stress and uncertainties out of any course of action. It is important to be realistic in the planning stage and to gather as much accurate information upfront as you can. You then carefully develop the sequence of tasks you need to complete – using the right tool for the job. Keep the software as simple as you can to accomplish your project and you’ll be fine. And just in case you wondered, no, I didn’t use project planning software to write this article.